I read and very much enjoy so many different stitching blogs, but I hadn't gotten into blogging myself ... until now ... I finally have something I think is worth sharing through such a forum. I'm just so tickled with myself, LOL ...
My brother made a silver bracelet for me years ago in a summer school art class during high school (or maybe even junior high). Unfortunately, possibly due to my personal hormonal changes (hot flashes started at age 26, but so far none of my doctors have thought it important to look into -- and here I am just turned 37 and sweating-like-I'm-in-the-shower ten or more times a day plus the night sweats), I haven't been able to wear silver for years because it tarnishes when I do. Plus, my hands have grown to the point that I cannot get this lovely bracelet over my knuckles anyway. My brother just got married in June, and for his wife's birthday, I decided to give her the bracelet (with his permission) so it can be appreciated. I consider myself to have been only its temporary guardian. But I needed a pretty box of some kind for it.
So I picked up a
paper mache box at
Hobby Lobby. I planned to paint it, but that didn't really work out well. The paint was supposed to be a metallic red (red is her favorite color), but it came out flat, and even has a fog-like tinge in places.
(I think the problem is that I was supposed to use a particular base coat, but I did not read the instructions that carefully until after I'd sprayed three light coats of paint. By then, I wasn't about to go find the proper basecoat.)
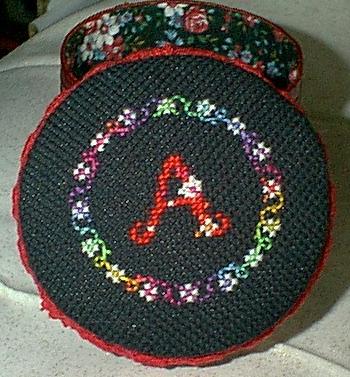
Hmmm. The fog-like tinge made it look old-fashioned to me ... So I ran with that idea and now have something reminiscent of a Victorian trinket box. I stitched her first initial (using a 1998
Framecraft Handbag Mirror and Pouchette pattern called
K104 Initials designed by Christine-Ann Martin, my own choice of DMC threads along with
Needle Necessities overdyed floss 1931~Calypso, and 18 count black
davosa) and then set about trying to finish this little box similarly to
Judy O'Dell's instructions for finishing tins.
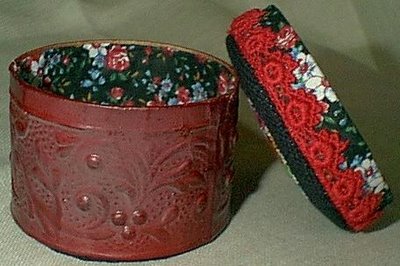
I had to finagle several things because the box is round, because the davosa is a bit thicker than linen, because I couldn't find my glue gun, because I didn't have any batting, because I didn't want to make (or buy) cording (which I wasn't sure would work with the little gap I had between the stitched top and the top of the box itself anyway), and because the box is over two inches deep.
I used
Aleene's Original Tacky Glue for everything, stuffed the stitched parts with Poly-Fil, laced the stitching for the top of the box to make it as compact as possible, whip-stitched the stitched top to the lining fabric (after gluing the lining fabric on), then whip-stitched the red lace around as trim.

The lining fabric was something I've had for several years which I thought worked really nicely with the stitching, the not quite metallic red, the original flowery pattern on the paper mache box, and the red lace. The red lace was something I've had for many more years, perhaps even handed down from my grandma's sewing box!
The only part I'm not completely happy with is the lining fabric on the inside of the box. As you can see in the pictures, it puckered a little bit,

although the pictures make it look worse than it actually is. However, for my first attempt at something like this, I think it turned out really, really well.
I've only once ever done anything with my stitching other than frame it in some way (or leave it to be framed or otherwise finished later, LOL), so this is a really big deal for me!
Now I have to make one for myself, ha ha!


